Monday, May 25, 2009

How to Get the best hairstyle

Leave a Comment
How to Get the best hairstyleHair is a natural and personal asset that can be arranged and styled to accentuate your personality. The first impression that you make is largely dependent on your face and what you have on top of that.

The two features, that is your face and your hairstyle would complement each other. As you really can’t do much to alter the shape of your face, it becomes all the more important to adjust and style your hair to add to your facial personality.

Follow the steps to arrive at the most appropriate style that adds to your personality.

Step-1 The shape of a face can broadly be classified to five or six types. It could be a round or an oval shaped face. Some have a squarish or a rectangular shape while at times it may be heart shaped.

Determine the shape of your face by spending some time before a mirror. That’s the most important step, for, what suits somebody else may not suit you due to difference of shape.

Step-2 Hair styles need maintenance and thus demand your time. You may choose a style that looks good on you but it may need a bit too much of your time everyday or at times you may feel more convenient in a different style, depending on the activities, (and even the profession) that take most of your time.

Do you like to pull them down at the gym or do you like those to be falling on your face? Take all that into consideration.

Step-3 Watch people around you to assess the shape of their faces and the kind of style they are flaunting. Better still, collect magazines connected with fashion and cut out the snaps of celebrities with your kind of facial shape.

Now compare those cut outs, keeping in mind the above two steps. Short list a few that impresses you most.

Step-4 Are you aware that there are a few websites that allow you to load a photograph of yourself and virtually try a new style. Some are free. Search the net to choose one and try a virtual style.

Stp-5 Consult the stylist. Armed with those snaps and the virtual styles approach your stylist and take his/her opinion. He will educate you on all the aspects right from the most suitable style to the effort you’ll be required to maintain that style.

Step-6 Maintain a positive frame of mind, after all it’s your hair. Even if you don’t
Read More...

How to wax your legs

Leave a Comment
http://images.teamsugar.com/files/upl1/20/202586/46_2008/c12d44713e0cf0ec_a-leg-wax.jpg
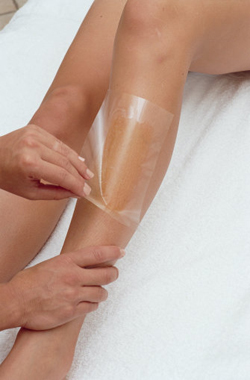
There are a number of ways in which one can remove body hair, whether through shaving, waxing, threading or laser hair treatments. Waxing is one of the safest and most preferred methods of hair removal among women. Although it is a little painful, it has no adverse side effects
. Below are the steps involved in the removal of hair from the legs through waxing
.

Select a wax: First you have to select the product that you want to use. There are different kind of waxes and sugar solutions available on the market.

Instruction manuals are provided with the products. It is important that you carefully read the instructions, preferably more than once. Some waxes require that you heat them before using them. In such cases, be sure to follow the recommended heating time and methods.

Application of the wax: After heating the wax check its temperature. If it is too hot you might end up with heat burns. Before applying the wax, be sure that your legs are dry.

If waxing your legs for the first time, apply a thin layer of wax or sugar solution to a small area of the leg, following the direction of hair growth.

Removing the hair: After applying the wax to the area, press a strip of muslin to the leg. At the base of the strip, that side nearest to your foot, turn a small section back, turning it against the strip in such a way that it lies flat against the strip.

Raise the end of the strip as described in the instruction manual and pull the strip back towards you. Pulling the strip back is the correct method; do not pull the strip up.

This is when you might feel a little pain, and if you do, the pain should subside within a second or two. Remember that it is not necessary for all the hairs to be pulled out at one time. The procedure can be repeated if hairs remain in the area. Repeat this process as often as necessary until your leg is completely free of hair.
Read More...

Friday, May 1, 2009

Home made summer skin care Tips

Leave a Comment
Summers are back with a bang...and so are countless summer skin woes! From skin ailments including sun tan, sun burn and dehydration to serious versions like blemishes, pimples and pigmentation – summers are notorious for ruining our skin. But you don’t have to fret!

http://allwomenstalk.com/wp-content/thumbs/42865.jpg

Take a heart and beat the heat this summer, maintaining your beauty and keeping your skin soft, supple and well nourished with these home-made summer skin care recipes...

Tired of the tan?
When wearing your summery dress becomes next to impossible thanks to changes in your skin tone due to excessive tanning, these natural bleaching agents can be used thrice a week to cleanse your face and body ...
1. Summer facial bleach
Ingredients: 4 tbsp milk, 1 tbsp honey, 2 tbsp lemon juice.
Mix all the ingredients and apply the mixture evenly on the tanned areas for 15 minutes. Once dried, wash with cold water. Works best for greasy and oily skin.

2. Yogurt and honey cleanser
Ingredients : 4 tbsp plain yogurt, 2 tbsp honey, 3 tbsp lime juice
Mix all the ingredients. Add a little cornstarch if you think the paste needs thickening. Apply on your face and massage for 2-3 minutes. Rinse with cold water.

For an all- natural exfoliation...
Excessive heat added with dry winds, overheat the body and it’s the face that suffers the most. The delicate tissues get damaged and the outer layer of the skin bears dirt deposits in the clogged pores leading to an excessively rough, wrinkled and dry skin. A quick and easy session of exfoliation is all that you need in case of such beauty emergencies!
1. Oatmeal exfoliating scrub
Ingredients: 1 tsp fine oatmeal, 1 tsp baking soda
Mix the ingredients in enough water to make a thick paste. Rub over face for 2-3 minutes, rinse and pat dry. It’s suitable for all skin types.

2. Curd and gram flour scrub
Ingredients: 1 tspn gram flour, 1 tspn lemon juice, 2-3 mint leaves, toned curd, a small piece of grated carrot
Mix all the ingredients to form a past and apply on your face. Rub in round motions to clean the deep rooted impurities.

Get the glow back...
You face seems to have lost its lustre? Well, here’s all that you can do to get back your lost sheen and make your face smooth, soft and fresh like never before in just 20 minutes...
1. Home spa recipe
Ingredients: Pineapple pulp, grapeseed oil, papaya pulp, mulethi and turmeric
Mix all the ingredients to make a paste. Now apply a generous amount of the mixture on face and neck leaving the eyes. Let it dry and rinse with fresh water.

Pimple problems...
This comes straight from your kitchen garden to bring relief to a pimple prone skin...
Ingredients: 3-4 tbspn cucumber juice, 1 tbspn lemon juice, a pinch of turmeric powder, 1 tspn sandalwood powder, mint leaves (tulsi) and basil leaves.
Mix all the ingredients and apply on your face for fifteen minutes. The pack has an overall cooling effect apart from taking out dead cells, dried sebum and infectious bacteria accumulated in the clogged skin pores.

Tone it up!
Apart from regular bleaching, cleansing, scrubbing and exfoliation, your skin requires bouts of toning during the summer season. So, instead of depending upon chemical-based toners, here’s a natural toner...

Find an aloe-vera plant in your vicinity. Now, just break a leaf, break it into two and use the extract or the juice mixed with natural rose water for best skin protection from tanning and clogging. This also helps to overcome the skin allergies, rashes and itching.
Read More...

Beauty tips to beat the recession

Leave a Comment
http://www.wildsound-filmmaking-feedback-events.com/images/beauty_tips_pic.jpgHAIR CONDITIONER
Regular way : On your hair.
Credit crunch way : Hair conditioner makes brilliant shaving cream. To get the best results, and prevent ingrown hairs, your skin needs to be soft. If you apply a large dollop of conditioner to your legs, underarms and bikini line, it will soften the hair and skin, giving you a smooth result.

PETROLEUM JELLY

Regular way : To soften lips, and dry areas such as elbows and knees.
Credit crunch way : Make-up artists use petroleum jelly in several
ways. First up, they use it as a brow smoother (get a small amount on
your finger, then smear it over your eyebrows to keep them smooth and in place). They also mix a small amount into eye shadow to turn a powder shadow into a creamy one.

BIO OIL

Regular way : Massage it on to skin, to soften the appearance of scars and stretch marks.
Credit crunch way : Many celebrities use it as an eye cream or face cleanser. Shilpa Shetty massages it into her dry face last thing at night, before removing it with a hot, wet face cloth to take away make-up and grime. You can also use it in place of expensive eye creams, as it has the same softening effect on the wrinkles around your eyes. It’s also good on stretch marks and scars.

BABY LOTION

Regular way : To soften your baby’s skin.
Credit crunch way : If you’ve got
a baby, pinch some baby lotion, which is a multi-purpose lotion and use it as a regular moisturiser, or as a gentle eye make-up remover
(apply it with cotton wool and then wipe it off).

EYELINER
Regular way : To line your eyes.
Credit crunch way : Eyeliners
double up brilliantly as eyebrow pencils. Make-up artists always use eyebrow pencils to neaten brows,
fill in any gaps from over-plucking and to give a defined brow which lifts up the whole eye area, making you look brighter eyed. Use short, feathery strokes and stay within the brow. Always use a shade slightly lighter than your natural brow colour.
Read More...